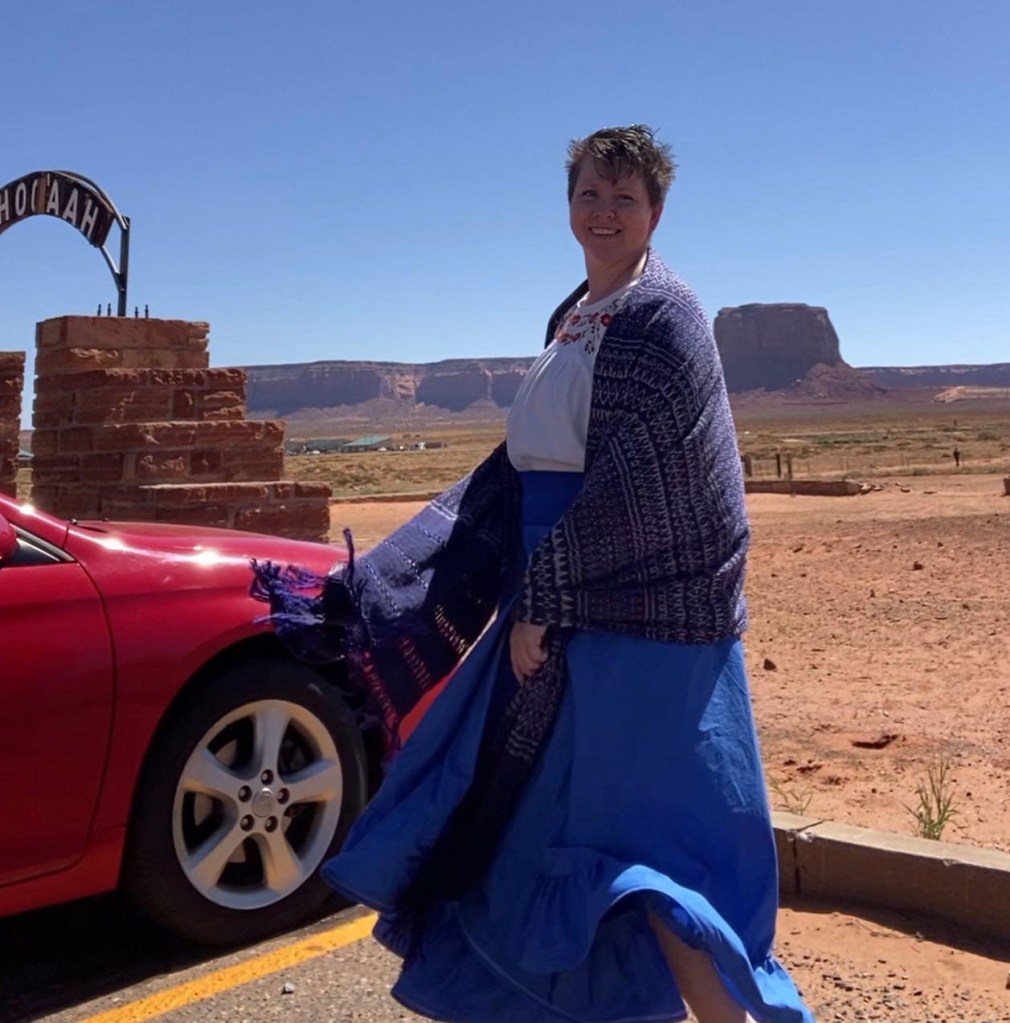
I saw a TikTok about visible mending right after we moved to Monument Valley, and I’ve been wanting to try it since then.


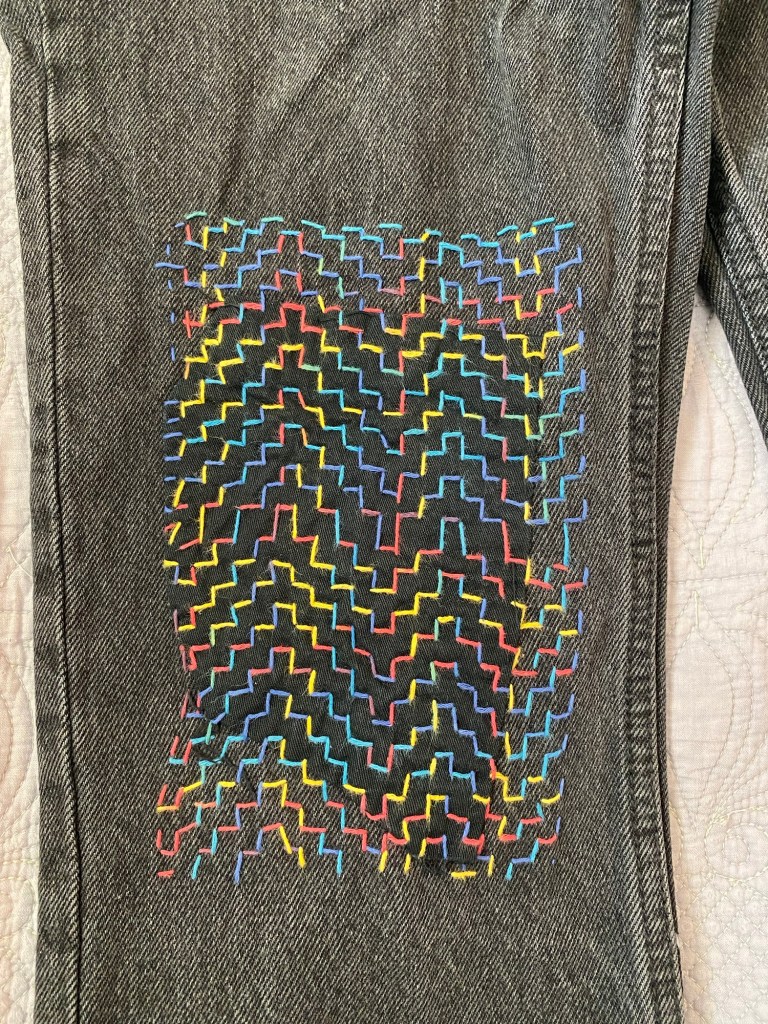
I saw a TikTok about visible mending right after we moved to Monument Valley, and I’ve been wanting to try it since then.
Banana Cream Pie refuses to wear pants because she hates sitting on seams. So I used some fabric that I kept when we moved to make her a skirt. I used an old skirt that she liked as the “pattern.”

One of the days for Homecoming Spirit week was “Wear your Bluebird Flour gear.” Apple Pie really wanted something to wear, and she pestered me until I figured something out. And then continued to pester me until it was done.

I used the Feliz Apron Dress pattern from the book Sewing Clothes Kids Love by Nancy S Langdon and Sabine Pollen. I’ve made this dress before. It is one of my favorite patterns.

Apple Pie was thrilled, and I really enjoyed making it!

Living in Monument Valley has spectacular views. There are other, less spectacular things. Like very spotty cell service and frequent power-outages. Usually the power is only out for a short time, but this Saturday it was out for about 24 hours.
The power outage interrupted my weekend sewing project.
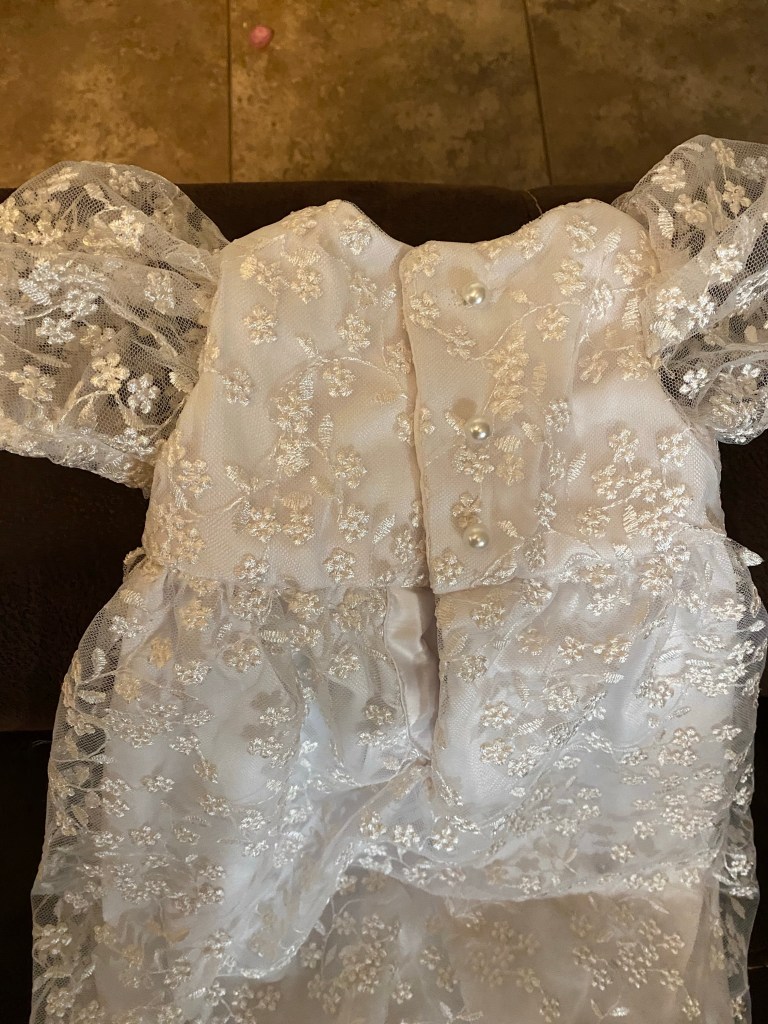
A few years ago, I made a wedding dress. There was some lace left over, and I promised to make a baby blessing dress for the bride’s baby girl.
Baby girl is on her way here, so I got out the lace. There was far less lace than I remembered.
First panic.
I finagled around and got all the pieces I needed cut. I did some sewing and put the project away for the next day.
A week or two later, I finally had time to get it out again. I could not find some of the pieces. I looked and looked, but they were lost.
Second panic.
I considered cutting the skirt shorter to replace the pieces. I called my sister, and she talked me off that ledge.
Then I found the original pieces. They were the pieces I had already sewn together, and they had been right in front of my face the whole time. My sister suggested medication. I decided I had better finish the dress that day rather than lose pieces/forget what I had already done yet again.
The pattern instructions confused me several times. I read them and re-read them and re-read them again. Finally I figured out what the pattern was telling me to do. This dress has a bodice front and back, a lace overlay front and back, and a lining front and back. I was confusing the bodice and the bodice lining. 3 layers. Not 2. I had to cut out more bodice pieces. So now the skirt lining is shorter, because I had to get that fabric from somewhere, and Jo-Anne’s is 3 hours away!
I sewed the bodice together wrong two different times before I got it right. I really hate unpicking lace.
Finally, the dress was all the way sewn, except for the sleeves and buttons. Then the power went out. Forced sewing break.

Did I mention that it’s hard to do a sewing project when you live almost 3 hours from the fabric store?
I had to get creative a couple of times, when I didn’t have what the patterned called for (interfacing—replaced it with fuse-able hem tape), and I almost gave up when it got time to put button holes in. My machine is a tiny bit broken on it’s button-hole function. I tried elastic loops for the buttons, but they looked terrible.
The resident captain came to my rescue and suggested hook and eye closures and to let the buttons just be for decoration. Quick as a wink, I applied his genius idea. Also, I managed to break a hand sewing needle, as well as stab myself and bleed all over the dress while I was sewing on the buttons, because that fuse-able hemming tape turned out to be really hard to sew through.
Now it’s been a week since I finished the dress, but it isn’t mailed yet because another quirk of Rez life is that the post office is only open from 9 AM to 1 PM (fairly frequently it closes earlier than the posted hours.) So I can only go on my lunch break. Additionally, the post office only takes cash. So it took me several days to get cash and several tries of not making it to the post office in time. Tomorrow will be the magic day, I’m sure of it.


Because it makes total sense to spend five hours making a skirt for a ten-minute presentation you agreed to do at the school.

Stages of making a circle skirt:
Stage 1: 20 minutes
You have cut out the skirt and sewn the side seams.
You feel amazing.
Circle skirts are so easy!
You begin planning to make one for each of your children (even the boys) and all of your best friends.
All you have to do is put on the ruffle and hem it, and you are done.
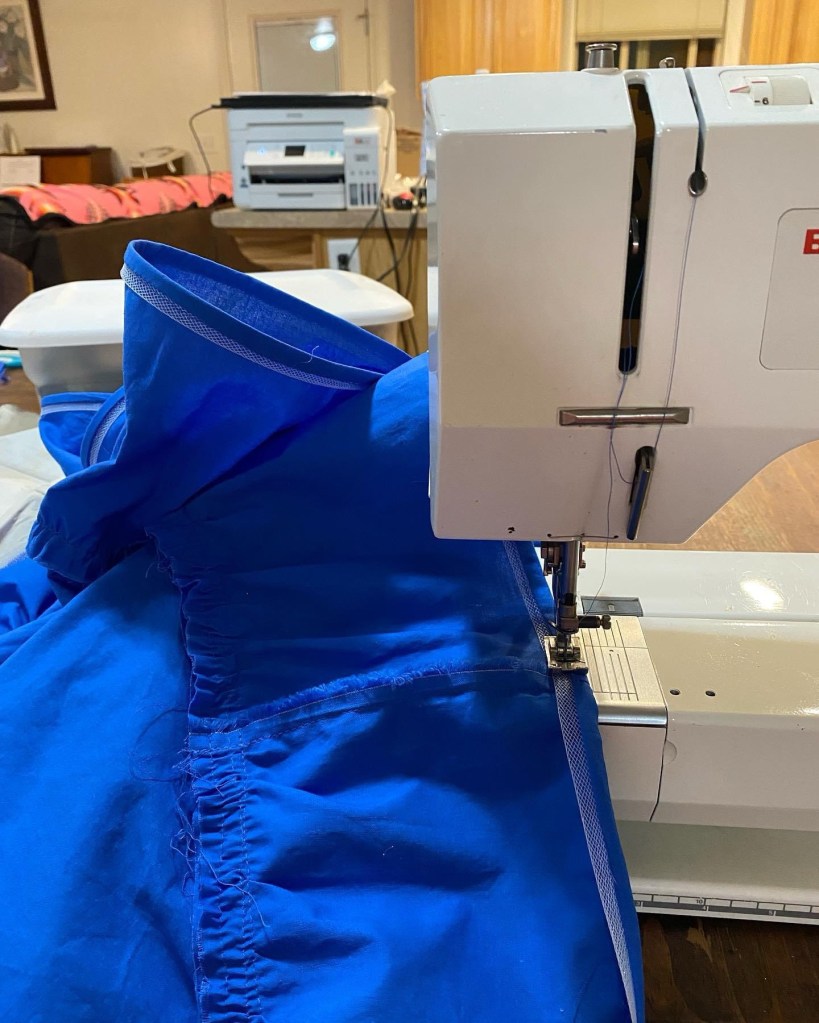
Stage 2: 2 hours
You have sewn 320 inches around the ruffle twice to baste it for gathering.
You are gathering and gathering and gathering .
You feel sorry for women who had to sew by hand.
Stage 3: 4 hours later
You have attached the ruffle to the skirt, sewing all those inches again.
You are still not done hemming this blasted skirt, even though you are using the secret weapon: horsehair braid.
Your back hurts. Your neck hurts.
You remember that you hate hemming skirts.
You feel like punching yourself in the face for starting this dumb project.
No way will you ever make a stupid circle skirt again, not even for someone you love, and not even if they offer you piles of money.
Final stage of making a circle skirt:
The skirt is fun to wear.
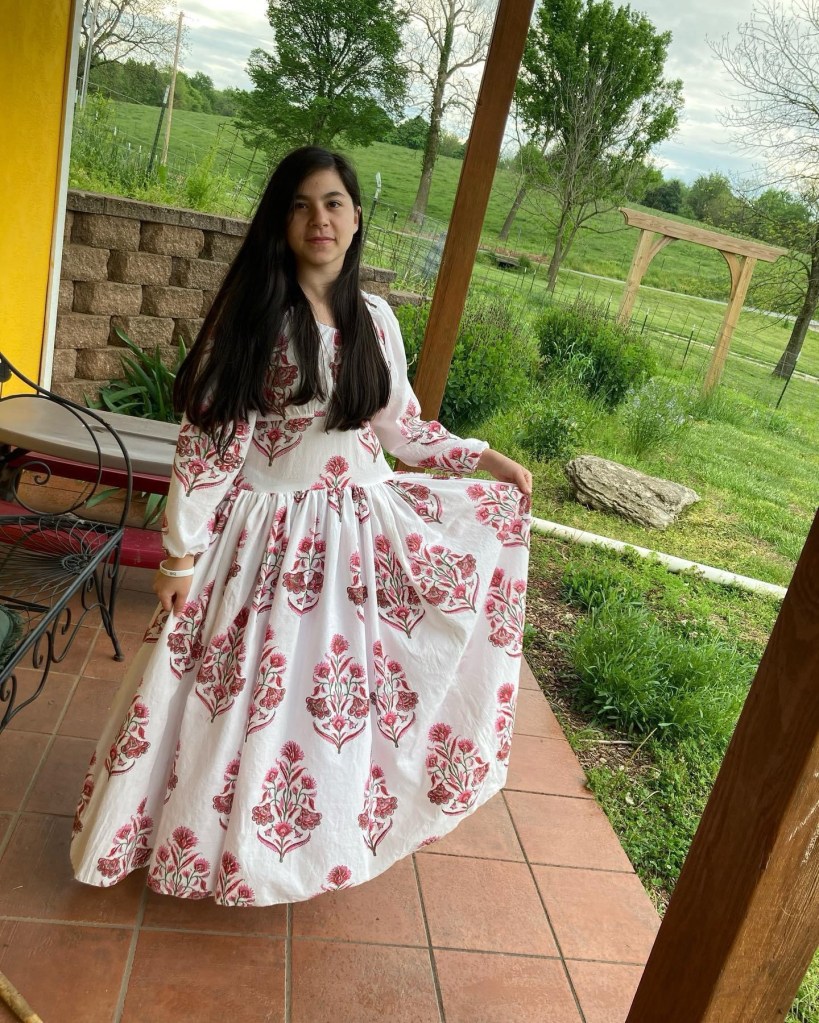
This was a fun dress to make. I used the tunic pattern from Sew Serendipity, lengthened the sleeves, and added a full skirt. 6 yards of hand block printed cotton voile


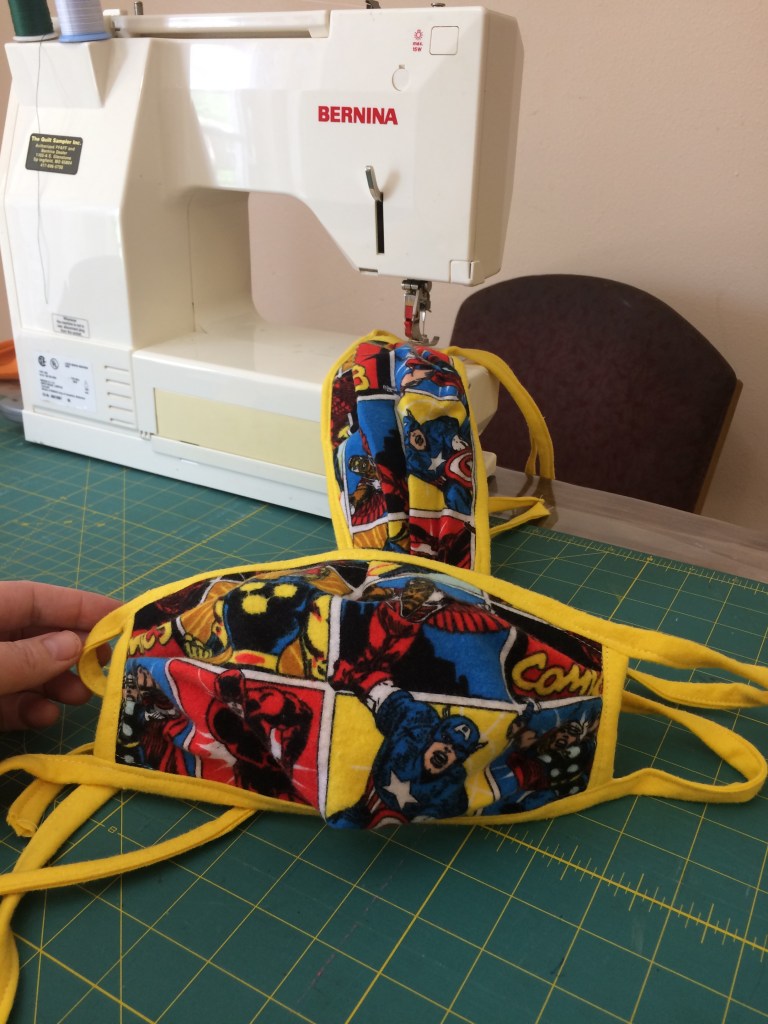
I got out my sewing machine a little reluctantly this morning to make some masks in case one of us needs to venture out for groceries.
I really dislike this feeling of invisible contagion, that someone I meet may be ill and spread disease to me, or that I may unknowingly be ill and spread disease to them.
Last time I got out my machine, it was to mend my boy’s pants, and before that, it was to make a wedding dress for my lovely niece. That was a happier time.
But I realized suddenly that every time I use my sewing machine, it is because I’m making something for someone I love. This time it is for unknown someones—to protect them in case I am ill and don’t know it. So that’s alright.
Also, this superhero flannel scrap has been waiting and waiting, and today is his day. I found the perfect project for superheros. #quarantinelife 😷

Still working on goals from day 6. Trial sleeves are a good fit (That lace is super scratchy. I’m glad it’s not what the final dress will be made of.)

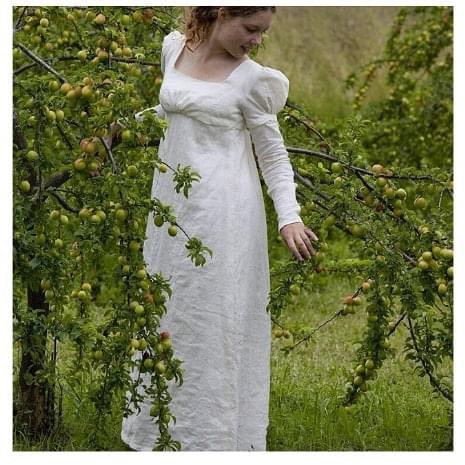
day 5: Jane Austen dress
Today I took a break from actual sewing because the muslin was freaking me out.
I know it’s so I can make sure it “fits right” but on a style of clothing that is so very different from what I’m used to, how do I know if it is fitting right?
I read some internet articles on regency fitting and regency stays, but just let them sit in the back of my mind, I wasn’t sure yet how to apply the knowlege.
Also I needed a helper.
So I weeded the garden and contemplated the fact that I’m actually about Mrs. Bennett’s age and not Elizabeth Bennett’s age.


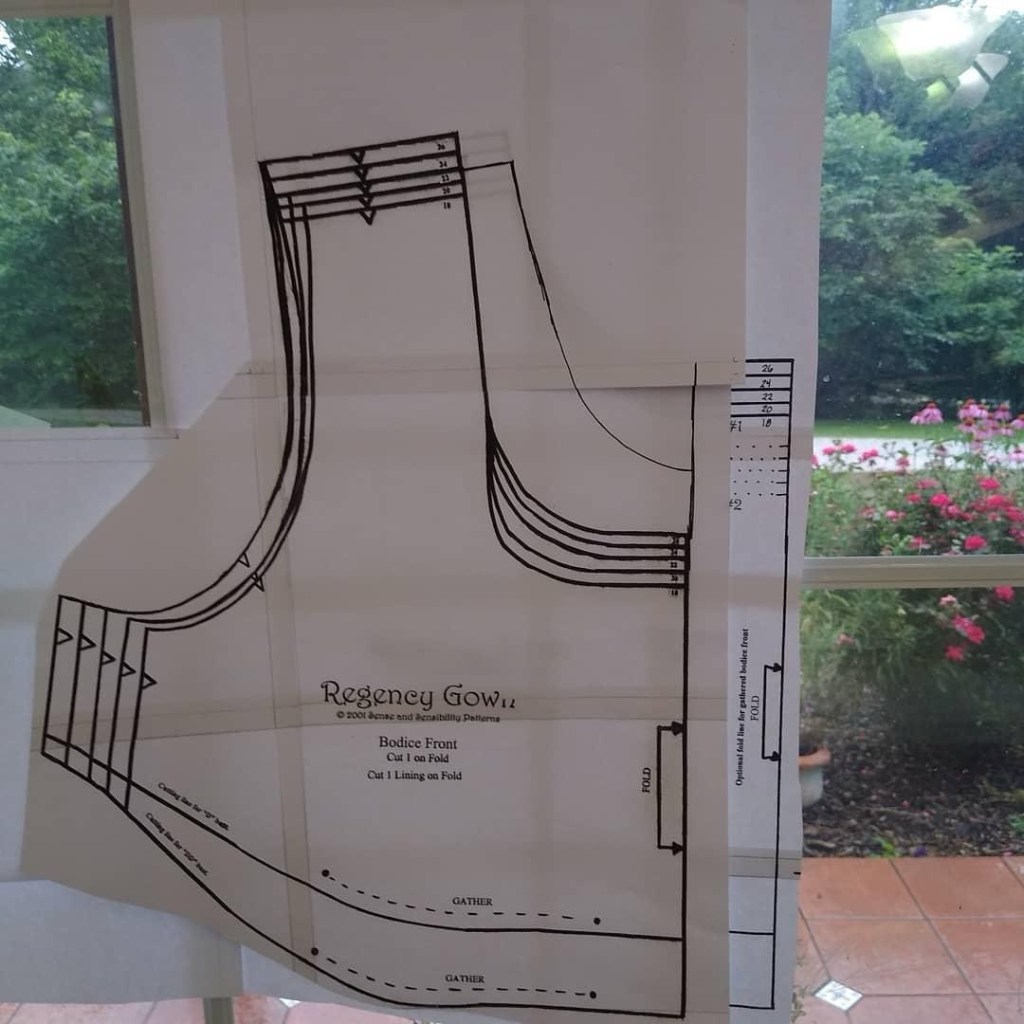
This morning I woke up knowing what to do (after thinking about those fitting blog posts all day.) The important thing is that the waist be exactly at the underbust line and no lower/higher, so that’s what I need to make sure of. My helper pinned the back of the bodice closed for me, and I was able to determine that it was an inch too long, which I have trimmed. I did that by marking my underbust line right on the fabric with a sharpie, and then comparing it to the pattern and adding 5/8ths of an inch for seam allowance.
Goals: put sleeves on the muslin to make sure they fit too.

Alter the skirt pieces to make the waist measurement match the bodice measurement (necessary because the original pattern doesn’t go up to my size, but I have the supplemental PDF file that explains how to alter the pattern.)

Day 3: Jane Austen Dress
Goals: Decide long sleeves or short sleeves?
Figure out what size to make
The girls weigh in:
Renata: ” What are you making if for?”
Me: “For fun.”
Renata: “Then make short sleeves because gloves are fun.”
Ana: “I’m gonna look so good in those wench gowns.” (Name that movie)


