Archive | Hen Day RSS feed for this section

Roman Shades

11 Oct

I have in my house what we call the “Big Room.” It is located over our garage and is 18 feet wide and 24 feet long. The kids play there–it is our family room and it is glorious. It has 4 large windows, two on the south and two on the west. Because of those windows, our Big Room gets pretty warm in the afternoon, and there is a constant glare on the TV. So I wanted to make curtains. My husband likes streamlined, modern things, so I decided to try roman shades. I guessed how much fabric I would need and purchased it. Plus lining, ring tape and nylon cord. Then I put it in a pile and was too scared to do anything else–even though my sister-in-law loaned me a great book on making curtains by Better Homes & Gardens.

PRAIRIE HENS TO THE RESCUE!!!!!!!!!!!!!!!!!

My wonderful friends Lucy and Jill came over and forced me to start. They cut out the fabric and cleaned my kitchen too!

They had to go home then, so now it was up to me to be a big girl and finish my project. First I got out my trusty Bernina 1008 which I have owned for 11 years now. I bought it with my very own money when I was 19. Occasionally, I see other machines with lots of fancy stitches or Aunt Lucy’s Pfaff, which is better for quilting, and experience a flash of envy. But this little work horse of mine always does what I need it too.

Then I sewed the lining to the face fabric. I really debated about how to attach the ring tape to the shades. The book was pretty vague at this point. It just said, “Sew around the ring tape.” But I didn’t want sewing lines up and down the whole shade. I have never seen one like that. Finally, I pinned it on

and then tacked it with my machine below and above each ring. That worked great.

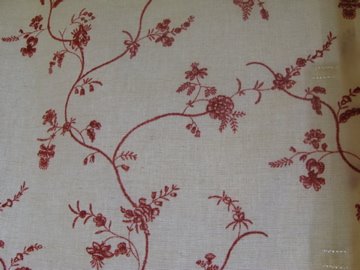
Up close, you can see the stitching when the light shines through. (PS isn’t my fabric awesome !) My DH helped me to hang them in the windows.

FINAL NOTE : My sister doesn’t know what DH means–she says in softball it means “Designated Hitter”. I guess that works, but what I mean is “Dear Husband.” Which I think is nicer than “Hubby” and fast to type, besides. So I hope no one is confused any more.

A post!! I am posting!!

10 Jun

Okay, I have all sorts of good intentions about posting (so you all know that I am heading straight to ____) for weeks now. I am desperate to post and desperate to craft and neither of them have been happening. But I am fixing part of that tonight. Maybe I can get to the crafting tomorrow. I am covered in poison ivy YET AGAIN. It is all the fault of these murderous dairy goats. Why we keep them, I do not know. I am sure I get the poison ivy from them when I milk (the oil being on their fur because they wallow in it.) because I am so careful to not get it from the plants themselves. Well, I guess I don’t have a picture of the goats yet…I’ll work on that.

For now, I am posting and not scratching…very much.

Lots of great things have happened in our home the last few weeks.
My oldest child and only son did turn 8 last month and was baptized. Here he is.

Here is a 4 Generation photo of him, me, my mother, and my mother’s mother.

Here is a tasty cheese pie I made for Hen Day in May when the Prairie Hens came to my house.

It tastes like cheesecake and is easier to make. You can play with the amounts of cream cheese vs. other soft cheese. I like to have at least 8 oz of cream cheese for that rich cheese cake taste.
Cheese Pie

Shortbread Crust:
1/2 cup butter, softened
1/3 cup sugar
1 1/2 cup flour ( I do 3/4 whole wheat and 3/4 all purpose flour)
Mix together in at medium speed, scraping bowl often.
Press into deep pie dish or round cake pan.

Filling:
8 oz cream cheese
1 1/4 cups yogurt cheese (drain plain yogurt for 30 min. or so) OR 1 cup sour cream OR 1 cup ricotta cheese
1/2 cup sugar
2 Tbsp flour
1 tsp vanilla
1/8 tsp salt
3 large eggs
2 egg yolks
2 egg whites
2 Tbsp sugar

1. Preheat the oven to 325 deg F.
2. Mix Sugar, cheese, sugar, flour, salt, eggs, and yolks well.
3. Beat egg whites until soft peaks form, add sugar and beat till glossy peaks form.
4. Fold egg whites into filling mixture and pour into pie pan.
5. Bake at 325 for 45 minutes to one hour. Cool and serve.

Sauce

2 cups berries
3 Tbsp sugar
1/2 tsp corn starch
Mix in a sauce pan and heat to a boil. Boil, stirring constantly for 1 minute. Cool and serve.

We also had some tasty chocolate pudding made by Lucy. Here is some true happiness.

I don’t have the recipe Lucy used. My new favorite pudding recipe is one my grandpa used to make. It is INSTANT HOMEMADE PUDDING!!! No standing over the stove stirring for an hour until it thickens!

Blancmange by Owen C. Bennion

1. Put 3 c water in pot, add 1/2 tsp salt and bring to boil.
2. Blend 1/2c sugar
6 T cornstarch
2 c powdered milk
2 eggs
with 1 c water
3. Add to pot.
4. Keep stirring until it begins to thicken 5-10 minutes Maximum.
5. Add 1 tsp. vanilla and 1 cup coconut.

So tasty.

Hen Day

19 Oct


Okay, for Prairie Hen Day, It was my turn to make lunch. I chose pizza. The other HENS said I needed to blog the recipe, so here goes.

Here is my crust recipe, I don’t think it is the best ever, but it is simple. This is for 1 large pizza:

1 cup warm water
1 TBS active dry yeast
1 TBS sugar
1 tsp salt
2 1/2 – 3 cups flour (use the lower amount if you can manage it, it makes for a crispier crust)

1. Mix the ingrediants in the order called for and knead by hand or in your mixer (luckeeeey) for five minutes.
2. Allow to rise for 1/2 an hour (or if you are starving, skip this step, I usually do–but it does taste better the other way.)

While the dough is rising, make the sauce. This is a great sauce recipe. You must bear in mind that the *SECRET* to making great pizza at home is to spread the sauce thinnly. But I get ahead of myself

1. Put a small sauce pan on medium heat.
2. Swirl 1-2 TBS olive oil in the pan.
3. Add 1 crushed garlic clove and 1 tsp dry basil
4. Stir around for a bit and let it get smelling good.
5. Pour in 1 small (8oz) can of tomato sauce
6. Allow to simmer for a few minutes.

Okay now take your pizza pan and greaze it with shortening. If you have it, sprinkle corn meal over the pan.

Roll out the dough. I roll mine out right in the pan. Or you can roll it out on a floured surface and transfer it. It will shrink back as you roll. be patient, work bit by bit, and just keep rolling it. Roll it past the edges of the pan a bit so when it shrinks, it will be pan size.

Spread on the sauce (thinly, remember. You should be able to see the dough through the sauce. This is pizza, not soup) If you are only making one pizza, you may have some sauce left over. Use it to dip your crusts in later while you are eating.

Now is the fun part. Put on the toppings you like. I like to put any meat first. That keeps it down in the sauce and makes everything very ju-ic-y.

preheat your oven to 400 degrees F.

Now, two options.

1–either leave the cheese off and bake your pizza for 7-10 minutes, pull it out, add cheese and bake for 3-5 min more

or

2–put the cheese on and bake for 10-12 minutes, watching that the cheese does not burn.

If you like your crust very crispy, you made a thick crust pizza, or if your oven bakes hot, I recomment #1 so that the crust gets enough cooking time and the cheese doesn’t get too much.