Introducing Miss Kitty and her sister. I drew this kitty quilt block and my very talented friend Vea turned it into a paper pieced pattern for me.
I am going to attempt a tutorial on my favorite way to paper piece. I’m sorry about the bad pictures. I really need to read my cousin’s blog more. In this tutorial, the picture will come first, and then a description of what is happening will come second.
Some of you may be familiar with traditional paper piecing, in which you sew through your paper pattern. I don’t like that way.
(insert picture of Ramona the Pest in the flesh)

I like my way. Here’s why:
1. You won’t sew through the paper, thus you won’t have to make more than one copy of the pattern (saves paper)
And, You won’t have to tear the paper off the fabric when you are done. (I think the tearing distorts the blocks.)
2. You don’t have to think in reverse the entire time.
3. You will always be able to tell if you are sewing your fabric piece on at the correct angle, saving endless seam ripper time.
4. You can be exact about the size you need (less wasted fabric)
Without further ado, Let us begin
(“I haven’t tested it yet, but it should be perfectly safe. Just a bit of harmless brain alteration, that’s all.”)
Supplies:
Pins- flat head pins are best
Tracing wheel or seam ripper
Ruler- a smaller one, like a 6” square is more manageable.
If you have a ruler with a ¼” lip on it, bring it!!
Cutting wheel and mat
Iron & ironing board
Scraps
Sewing machine and Pencil
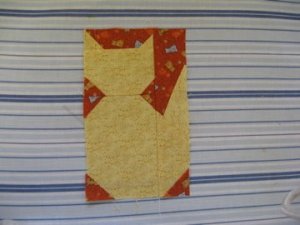
As you can see, my Miss Kitty is yellow with an orange background. Your pattern has numbers on each piece. You must go in order of number or disaster beyond your imagination will occur.

We are starting with Miss Kitty’s head.
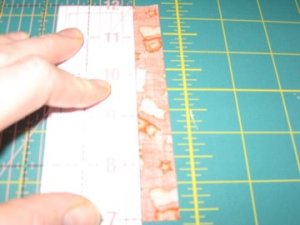
1. Take your Paper Piecing Pattern and Ruler and score all the lines with a tracing wheel or the blunt edge of your seam ripper. This is because you will be folding back the paper instead of sewing through it.
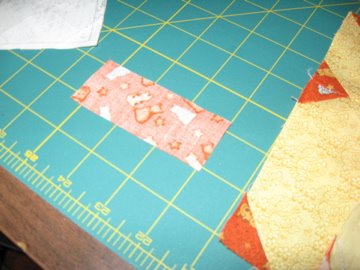
2. Measure each piece of the paper pattern. Find the longest horizontal and vertical measurement for piece #1 . Cut 1 orange piece of fabric 1 inch to 1 ½ inches larger than the pattern. As you get practiced up, you can use the smaller measurement.
*******

3. Place piece #1 face down (right side down) on the table.

4. Place the pattern face down (print side down) on top of piece #1. Make sure they are lined up and pin the fabric to the pattern. Make sure as you pin that the pin is not extending over into piece #2 (because that is where you are sewing next)

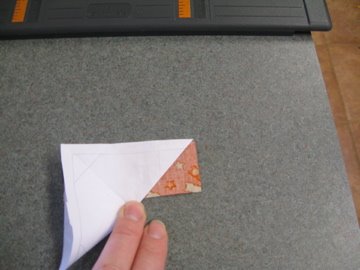
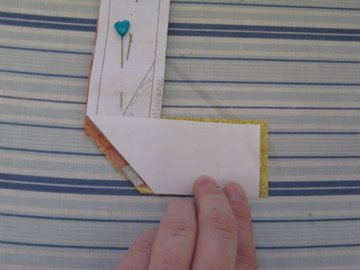
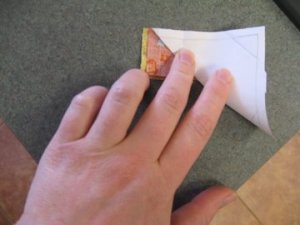
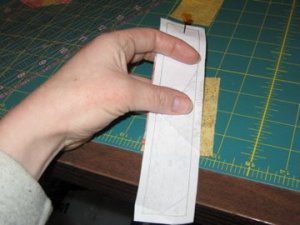
5. Fold back the corner of the pattern that has piece #2. You are folding exactly on the line between piece #1 and piece #2. (The scoring you did in step 1 makes this accurate and easy.)

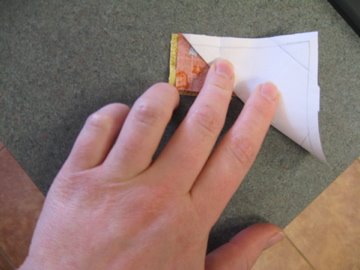
6. Measure ¼” away from the fold and trim off the excess fabric. (The ¼” is seam allowance.) Pretend this picture was taken at this step and not several pieces later.
7. Place fabric piece #2 face up ( right side up) under the fabric #1. You have now created a “sandwich” with the paper on top (right side down) Piece #1 next (right side down), and Piece #2 (Right side up).

8. Line up Piece #2 with the seam allowance or Piece #1 and sew along the fold line of the pattern, but not on the paper.

9. Flip the whole thing over and press open with an iron, or finger press. Pin as necessary. (again, you have to pretend I remembered to take a picture at the actual pressing of piece 1 and 2 and not after the pressing of the entire head section.)

10. When you are done, trim the edges REMEMBERING SEAM ALLOWANCE.
11. Repeat steps 2-9 for piece #3. Sometimes you may have to move pins- it depends on how small the pieces of the block are.
Now, I want to tell you about a special circumstance:
!!!!! If you fold the pattern and the next piece is cock-eyed or at an odd angle, line up the fabric piece under the corresponding folded over portion of the pattern. When you are done sewing and unfold, it will line up perfectly!!!!!!!!!!!!!!!!!

More Explanation: (We are doing Miss Kitty’s tail now…yes I skipped the body…it is just like the head, but bigger)

Here you see the background piece cut 1 inch bigger than the paper pattern.
Then I realized that I left the seam allowance on my pattern, so I trimmed the background to fit exactly.
Now I am creating that sandwich with piece #2 of Miss Kitty’s tail face up on the bottom of the stack.
I fold along the line between piece #1 and piece #2. Woa! Is this going to come out right? Remember the rule:
Line up the fabric piece #2 under the corresponding folded over portion of the pattern. When you are done sewing and unfold, it will be right.
You may not be able to see it in the picture, but in real life, I could see the fold lines showing the outlines of piece #2 on the paper. There was yellow fabric under the outline and extending at least a quarter inch past the fold lines on all sides, so I knew I was safe.

You Doubt me?
Ta Da! Happy Day 🙂 Now, trim it to quarter inch seam allowance and go on to piece #3.

It is a weird angle too, but again, see how to line up the fabric under the folded over paper #3

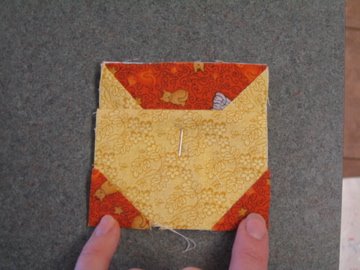
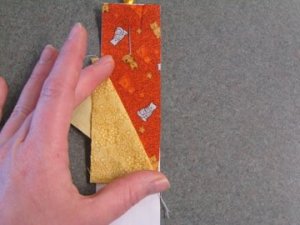
Three sections of Miss Kitty, now ready to be put together.
p.s. to get Miss Kitty’s sister, flip the pattern over and work from the back.