Archive | sewing RSS feed for this section

Primitive Nativity

17 Dec

It’s Finished!! the pattern is done and up for sale in my etsy store

I owe it all to the encouragement of my wonderful Aunt Lucy who insisted that my little nativity set was marvelous and that the world would love it.

P.S. writing patterns is time consuming and way harder than I imagined!!

Roman Shades

11 Oct

I have in my house what we call the “Big Room.” It is located over our garage and is 18 feet wide and 24 feet long. The kids play there–it is our family room and it is glorious. It has 4 large windows, two on the south and two on the west. Because of those windows, our Big Room gets pretty warm in the afternoon, and there is a constant glare on the TV. So I wanted to make curtains. My husband likes streamlined, modern things, so I decided to try roman shades. I guessed how much fabric I would need and purchased it. Plus lining, ring tape and nylon cord. Then I put it in a pile and was too scared to do anything else–even though my sister-in-law loaned me a great book on making curtains by Better Homes & Gardens.

PRAIRIE HENS TO THE RESCUE!!!!!!!!!!!!!!!!!

My wonderful friends Lucy and Jill came over and forced me to start. They cut out the fabric and cleaned my kitchen too!

They had to go home then, so now it was up to me to be a big girl and finish my project. First I got out my trusty Bernina 1008 which I have owned for 11 years now. I bought it with my very own money when I was 19. Occasionally, I see other machines with lots of fancy stitches or Aunt Lucy’s Pfaff, which is better for quilting, and experience a flash of envy. But this little work horse of mine always does what I need it too.

Then I sewed the lining to the face fabric. I really debated about how to attach the ring tape to the shades. The book was pretty vague at this point. It just said, “Sew around the ring tape.” But I didn’t want sewing lines up and down the whole shade. I have never seen one like that. Finally, I pinned it on

and then tacked it with my machine below and above each ring. That worked great.

Up close, you can see the stitching when the light shines through. (PS isn’t my fabric awesome !) My DH helped me to hang them in the windows.

FINAL NOTE : My sister doesn’t know what DH means–she says in softball it means “Designated Hitter”. I guess that works, but what I mean is “Dear Husband.” Which I think is nicer than “Hubby” and fast to type, besides. So I hope no one is confused any more.

Apron Swap Happiness

25 Mar

I am very late posting this to my blog. Here is the glorious apron I recieved from my Sassy Apron Swap partner, the amazing Allison. It is made from oh so pretty spring fabric and here’s the best part…it is a maternity apron, so it will fit me all year long! Oh! Surprize!! I am expecting a baby somewhere around October 8. My son is hoping for a brother to be on his team–he thinks his 3 sisters are a bit crazy sometimes.

Back to rhapsodizing about my apron…It has lovely large pockets on the front and it came with a matching hair tie. happy sigh. I wear it pretty much every day. Sort of like Gwenny, my 3 year old, and her sparkly shoes. I was telling one friend about the apron swap–how we have partners and we send someone an apron and then someone else sends us one. She got a really confused look on her face and said, “Why don’t you just make yourself an apron?” I didn’t know what to say. She just doesn’t get it, so I don’t think I could explain it. How you can make something way cooler for someone else than for yourself. And it is like Christmas to get that package in the mail from far away and be amazed and the perfect thing that a total stranger made special for you. And I got the most wonderful, sweet note from the lady I made my apron for saying how much she really loved it. That was the best part.

soft leather baby shoes-tutorial

7 Mar

I won’t ever actually do this, but one can dream, right?

http://blog.ohelene.net/?p=12

Apron Swap DONE!

6 Mar

I finally finished my apron for the apron swap. Only a week late. But I was sick last week. I procrastinated it for fear that I would make something awful and my partner would hate it. I still don’t know if she will like it, but at least it isn’t awful. I like aprons that have a top–that is the part of me that needs protecting anyway. My most favorite apron ever is one from Mexico. So I traced it onto brown paper and made a pattern. I like this apron because it makes me feel pretty to wear it. It is pink and has lace. The plaid fabric is a must to be authentic as are the flowers on the pockets. I chose dogwood blossoms because I am from Missouri, and dogwoods blooming means spring is finally here.

This is my new Kitchen Bling Bling from my dear dear Husband! Happy Day

I have already made bread in it. Happy Day. Look Look how shiny it is 🙂


These marvelous things were made for me by my sister, Mary. She brought them over on Valentine’s Day. Isn’t she amazing? I am way too lazy to do this much work on cupcakes. I was not too lazy to eat these though. hee hee.

Snow!! and Mittens Tutorial

1 Feb

***Edited 12-01-09 I just discovered the pattern I linked to is no longer available. Here is  a PDF file of the pattern. ** thanks

It snowed yesterday and last night!! Our first real snow of the winter! The kids were so excited to go out and play until their father said “You must clean your rooms first.” “Aww, Dad, you ruin everything.” Two of them didn’t have mittens that fit, however, so I promised to make them some while they cleaned their rooms. I got the pattern here from the LDS Humanitarian Aid Website. **See above for the pattern.  The one I chose was Fleece Mittens with a Ribbing cuff . I think in future I would choose the “Fleece Mittens with Elastic band” they look much easier to sew. The directions look more thorough as well. I am writing this tutorial in case you decide to be crazy and do the hard mittens, like me. I do like how long the cuff turns out to be. That is my pet peeve about store mittens, the cuffs are never long enough to tuck into coat sleeves.

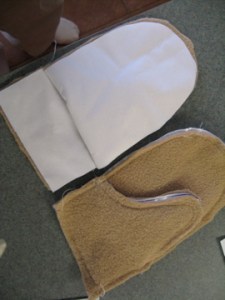
I didn’t trust the fleece to keep the kids dry. I have some scraps of PLU (polyurethane treated fabric) left over from making diapers, and I added a layer of that on the outside to waterproof the mittens.

Trace the pattern pieces onto the shiny side of the PLU. (the wrong side). Trace 2 for each piece, remembering to flip over the thumb pieces (A & B) so that you get a right hand and a left hand mitten. Cut them out. You can just pin the pattern pieces to the fleece to cut it–pay attention to which way the stretch is supposed to go.

After cutting out 2 of each pattern piece. I basted the PLU to its corresponding fleece piece. Baste them wrong sides together as you will not be turning them. Don’t forget to baste along the “bottom”–the straight part that will sew onto the cuff. This will divert disaster. (see more later.) **NOTE sew with the fleece on the bottom. That way, the machine feed-dogs will help to keep the fleece from stretching and distorting too much.

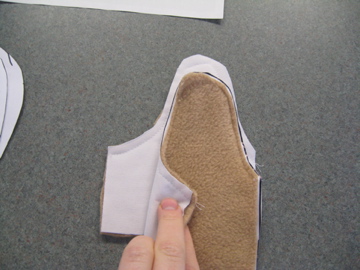
Here is pattern piece A sewn to pattern piece B (the thumb)

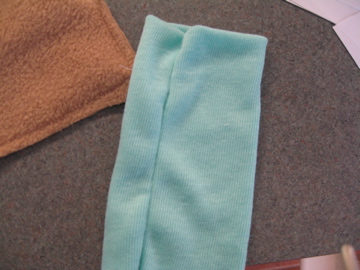
Here is the cuff, sewn and turned:

Here I have turned the cuff right-side out and then tucked it inside the mitten. Imagine this is the sleeve on a dress or shirt–that is why you want the cuff right side out. When you turn the whole thing, it will all work out right.

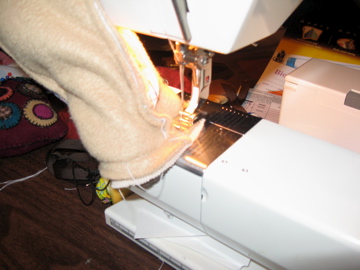
This is the trickiest part, sewing the cuff onto the mitten

Here is why you should baste across the bottom, to prevent this:

Here is the final product. I know, my skills are *great,* but this 7-year old was happy. You can see that after I fixed the major boo-boo, I accidentally sewed the cuff in inside out. A.k.A. didn’t follow my own directions above. But snow time was wasting. I might fix it later…

Wrap Dress Wishes

13 Oct

So I have been dying to have a wrap dress for months, and then Aunt Lucy sent me a link to this marvelous place

Frills,Frocks,Fancies

which was lovely, but really like salt on an open wound because she isn’t selling patterns, only kits, and those aren’t available until sometime in November at the soonest. I was quite sure that I would DIE without a gorgeous, girly wrap dress. I googled wrap dress tutorials and didn’t find anything satisfying at all.

So, I found an old bathrobe pattern and made it up with some $1 fabric I have had in the bottom of my stash for a long time. The pattern is basically just rectangles with arm ski’s cut out. I will try to post a drawing of the pieces soon. It would have looked much better with some hot pink bias tape trim, but that would have required a trip to Walmart and delayed my instant gratification. I added a couple of darts in back for a better shape. I had planned to add darts to the front, under the bust, but there wasn’t enough fabric.
**Note: I discovered the hard way that darts should be straight up and down, not at the same angle as the skirt, unless you are trying to make your butt look bigger.

In the end, it looks more like a hospital gown than a girly, sassy dress **sigh**

I get the urge to sing “Tub, tub, tubby…”

Maybe instant gratification isn’t all it’s cracked up to be….

P.S. Thanks to my DH for showing me how to put a link in my post. He is the bestest.

New marvelous things!

12 Oct


This is the Pointy Kitty, a free pattern from wee wonderfuls.

I added a couple of links to my blog list. If you like tutorials, check out My Half of the Brain. You will be in tutorial heaven.